A miter saw is an extremely useful home improvement tool. Learn how to get the most out of this workshop workhorse with these tips.

Master the Miter Saw in Days with These 13 Tips


Wait for the Blade to Reach Full Speed
Be prepared for a startling experience the first time you squeeze the switch on a power miter saw. The saw will jerk and whine as the miter saw blade gets up to speed. Listen for the blade to reach top speed before starting your cut. Then lower the blade slowly and steadily through the board until the cut is complete. Hold the saw carriage down in this position and release the switch, allowing the blade to come to a complete stop before raising it. Maintain a firm grip on the workpiece until the blade stops spinning.

Mark Danger Zones
Power tool safety is essential, especially with saws. Draw red lines on the bed and fence of your saw to indicate the “no hands” zone. Draw the lines 7 in. from 10-in. blades and 8 in. from 12-in. blades.

Use Stop Blocks for Repeat Cuts
Screw two blocks of wood to the miter saw stand to act as a stop for repetitive cutting to the same length. Set the lower block back about 1/2 in. so that if sawdust or wood chips pile up against it, they won’t affect the cutting length.

Build a Jig to Hold Crowns and Coves
Construct a jig to hold crown moldings at the correct angle. Set a scrap of your molding upside down in the jig and mark the position of the stop. Screw the stop to the jig. Place all fasteners away from the path of the blade. Attach the jig with 3/4-in. screws through holes in the miter saw fence. Cut miters with the crown molding upside down.

Use Shims to Shave Miters
Close a gap on the top of a miter by placing a skinny (1/16-in. or less) shim against the portion of the fence farthest from the blade. Slide the molding tight to the shim and against the fence near the blade. Hold it in this position while you make the cut. Caution: Keep your fingers at least 6 in. from the path of the blade. Trim the other half of the miter using the same technique. Use the same shim and place it the same distance from the blade. Drop the blade slowly through the wood to shave thin slices.

Make a Miter Saw Stand
Use 8-ft. 2x4s for the base. Cut a piece of plywood about 16 in. wide and the length of the miter saw and screw it to the 2x4s. Rip 2×4 blocks so they’ll support the 1×8 top flush with the bed of the saw. Screw the blocks to the long 2x4s. Then screw the 1×8 bed extensions to the blocks.

Retrofit a Miter Saw With a Laser
If you’ve seen those laser cutting guides on miter saws and wonder if you can add one to your old saw, take heart. It’s possible, and not terribly expensive. The guide fits alongside the blade, replacing the outer washer. When the saw starts running, the guide shoots a laser beam that shows exactly where the blade will cut.

Add a Wood Fence for Cutting Small Pieces
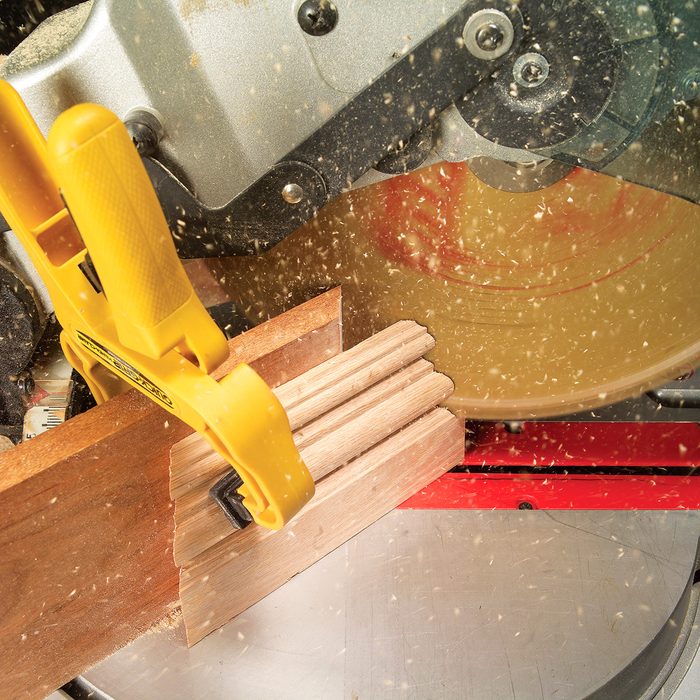
Cutting off small pieces is one of the most challenging and dangerous operations on a power miter saw. You’re never sure where the piece will end up. It usually becomes a high-speed projectile when it falls into the spinning blade. But there is a way to avoid this problem. The auxiliary fence helps keep the cutoff from falling back, and stopping the blade keeps the teeth from catching it.
What if you need to cut a piece that’s shorter than the 7- or 8-in. hands-free area? The best solution is to cut short lengths from longer boards whenever possible. However, when you have to trim a short piece of molding, use clamps to hold it in place. The auxiliary fence comes in handy for this task by providing a better clamping surface. You’ll get better quality miters because the molding can’t slide away from the blade. And you’ll be assured safer, hands-free cutting.

Fine-Tune Cuts
Adjust the blade angle slightly to fine-tune miter cuts for a tight fit. Nudge the blade adjuster and hold it in position until you tighten the locking handle.

Allow the Blade to Stop Before Raising It
Complete the cut and release the switch. Now here’s the key. For safety, let the blade come to a complete stop before you raise it.

Cope Baseboard Faster
Coped joints for baseboard look great but can be time-consuming. Instead of using a coping saw, learn to cope baseboard with a miter saw. It’s faster and works great for common baseboard profiles. Click here to learn how to do it.

Back Up Small, Delicate Pieces
Back up small pieces with a sacrificial board to prevent the cutoff from being thrown by the blade. Hold the saw down at the end of the cut until the blade comes to a complete stop.

Line Up the Blade with the Mark
Lift the blade guard with your thumb and sight down one edge of the blade to align your cut.
Caution: Remove your fingers from the switch while you’re aligning the cut. Firmly hold or clamp the workpiece. Then gradually release the blade guard and return your hand to the switch to make your cut.


