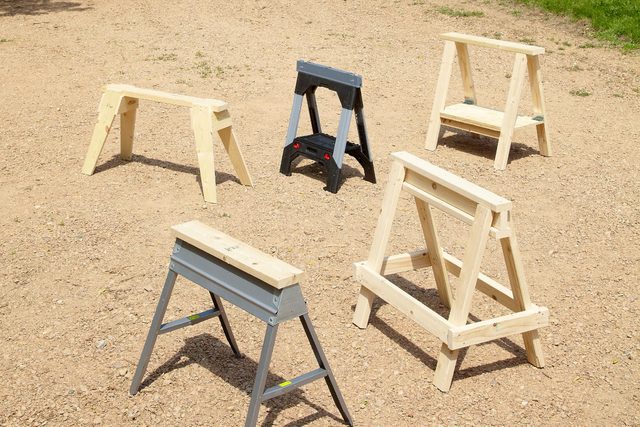
Five great sawhorses for your DIY workshop
1 - 2 hours
Beginner
Under $100
Introduction
Sawhorses are an essential construction tool, and this article highlights 5 of the best—3 DIY designs, with complete plans, and two off-the-shelf favorites.
Sawhorses are an indispensable part of your DIY workshop. Here are five of our favorites, including some you can build yourself.
Tools Required
- Air compressor
- Air hose
- Circular saw
- Cordless drill
- Framing square
- Hammer
- Hearing protection
- Miter saw
- Safety glasses
Materials Required
- 16d nails
- 1x6
- 2 x 4s
- 2-in. screws
- 2x6
- 3 1/2-in. hinges
- 3-in. screws
- 3/4-in. plywood
Watch Make Sturdy Sawhorses For Less Than $100
Project step-by-step (7)
1. A Quick-and-Dirty Sawhorse that’s Rock-Solid
- Buy two 12-foot 2x4s and one 10-foot 2×4.
- With 16d nails or 3-inch screws, assemble the three boards that make up the I-beam.
- Attach the legs, using a framing square to square the legs to the beam.
- Attach the rails last — you’re done, so get to work!

2. A True Classic that Will Last a Lifetime—or More
Here’s a design that’s been around for a hundred years — maybe longer. It’s low, so you can use your knee to hold down your work. The compound miters make this one a little trickier to build than the others, but if you take one component at a time and label them as you go, in a couple of hours you’ll have a pair of sawhorses that your own grandkids will be proud to replicate someday.
- Buy one 8-foot 2×6 and two 8-foot 1x6s.
- Cut the top to length first, then taper the edges on a table or circular saw.

Cut the Legs
- Set your circular saw to cut at a 13-degree bevel.
- Cut the legs to length at a 13-degree angle.
- Mark each piece as you cut it.
- Pro tip: It helps to cut the legs close to their actual size beforehand so you can hold them up and visualize the direction of the cut and the orientation of the bevel.
- After cutting the legs to size, reset your circular saw to 90 degrees and taper the legs.
- Mark the taper line 3-1/2 inches over on the bottom of the leg up to the bottom of the gusset.
- Lay the top board upside down on a flat surface and attach each leg with three 2-inch screws.

Attach the Gussets
- Trim the top and bottom edges of the gusset boards with parallel 13-degree angles.
- Mark one gusset using the sawhorse and copy the other three from that template.
- Set each sawhorse upright and set something heavy on it so all the legs are sitting nice and flat.
- Attach the gussets with four 1-5/8-inch screws.

3. A Collapsible Sawhorse with a Built-In Shelf
Some sawhorses have a shelf and some fold up, but this design combines both features.
- Buy a 4 x 4-foot sheet of 3/4-inch plywood, one 8-foot 2×6, one 8-foot 2×4, two 12-foot 2x4s and eight hinges.

Cut and Assemble the Legs
- Cut the top 2×6 to length.
- Cut both sides of each leg at a 15-degree angle.
- Note: Make sure the angles are parallel.
- Fasten hinges to the ends of two of the legs
- Attach those legs by fastening the hinges to the top piece.
- Attach the other two legs with 3-inch screws.
Attach the Shelf
- Cut the 2×4 that supports one side of the shelf.
- Mark a line 8 inches up from the bottom of the leg
- Line up the bottom of the 2×4 with that line, and attach it with two 3-inch screws on each side.
- Cut the shelf to size and notch the two corners using a jigsaw.
- Fasten the hinges to the shelf, then use two 11-1/8-inch blocks of wood to temporarily hold the shelf in place while you fasten the hinged side of the shelf to the legs.
- Cut a 23-3/4-inch x 1-1/2-inch strip of plywood to overlap the 2×4 shelf brace.
- Attach it with wood glue and 1-1/4- inch screws.
- Fasten the hinged side of the shelf to the legs.
- Note: The lip on the shelf holds the sawhorse rigid. To break down the sawhorse, simply lift the shelf.


